CROWN DIVISION
 One simple and reliable method for propagating plants at home is crown division. As a general rule, plants that flower in the spring and early summer should be divided in late summer or fall. Those flowering in the summer and fall should be divided in early spring before new growth begins.
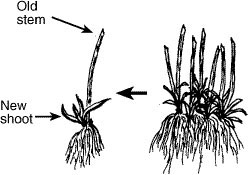
For crown division of herbaceous plants, such as irises, the clumps should be carefully lifted and some soil removed from the roots. The crown may then be cut into sections with a knife or other sharp tool. Individual shoots that contain roots may be used to form new plants, or if a larger plant is desired, several shoots may be left together. In large, old crowns, it is often best to discard the older, center portions and replant the young, more vigorous shoots that have developed on the edges of the clump.
Table 1: Some common perennials suitable for division
| Plant | Division Time | Plant | Division Time | Plant | Division Time |
| Aster (hardy) | Spring | Hosta (plantain lily) | Spring or fall | Phlox | Spring |
| Baptisia (false indigo) | Spring or fall | Iris (bulbous (Dutch) | Late summer, fall | Primula | Summer |
| Bleeding heart | Late summer, early spring | Iris, rhizomatous (German) | July, August | Red-hot poker (Kniphofia) | Spring |
| Chrysanthemum | Spring | Iris, fibrous (Japanese) | July, August | Rudbeckia | Spring or fall |
| Columbine | March | Lily | Fall | Sedum (stonecrop) | Spring, July, August |
| Coneflower (Echinacea) | Spring or fall | Lily of the valley | Fall | Sempervivum (houseleek) | Spring, summer |
| Coreopsis | Spring | Loosestrife (Lythrum) | Spring | Shasta daisy | Spring |
| Daylily | Late summer, spring | Oriental poppy | July, August | Vinca (myrtle) | Early spring |
| Delphinium | Early spring | Pampas grass | Spring | Yarrow (Achillea) | Early spring |
| Ferns | Early spring | Peony | Early fall | Yucca | Spring or fall |
LAYERING
Layering is a useful and desirable method to root a new plant while the stem is still attached to the parent plant. The new plant receives nutrients and water from the parent plant until roots develop. This method of asexual propagation yields a large plant in a relatively short time and is an excellent way to produce a small number of plants in the home landscape. Layering outdoors is best performed during spring and summer months, although it can be done during any season of the year.
Healthy, maturing branches that are vigorously growing in light should be chosen for layering since they usually have more food reserves (carbohydrates) and therefore root faster. Branches from pencil size to about ¾ inch in diameter are best for layering.
Layering can be done without any special equipment or structures. Some layering techniques include simple, tip, serpentine, and air. Simple layering involves pegging down a suitable shoot into the soil. Serpentine and tip layering are similar to simple layering with flexible shoots buried in the ground. Air layering is used for plants that will not bend down to the ground. I will not go into dropping or stooling. Dropping is used for dwarf shrubs such as rhododendrons and some dwarf conifers where the whole plant is buried with only the tips of shoots exposed above ground. Stooling is a specialized technique used for some ornamental shrubs like Cornus spp. (dogwood) and Salix spp. (willow) where the soil is mounded above an existing plant to create new shoots on the buried stems.
Simple Layering
 For the home gardener, simple layering may be performed whenever a plant has a branch low enough to be pulled down to the ground. It is a slow method and can take more than a year before you can separate the new plant from its parent. Simple layering is usually done in the spring when the sap is rising although it can be done from late autumn to early spring.
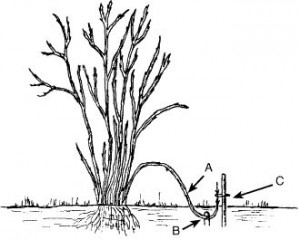
Many plants root when a leaf node of the shoot is buried several inches deep in the soil and the tip protrudes vertically from the soil. It is generally beneficial to wound or cut the stem at the point where it curves upward. The wounding tells the plant to send healing hormones to the cut surface. Make a slanted cut about 2 inches long either above or below the bend. Make the cut about 12 inches from the tip and dust it with a rooting hormone. Place the prepared branch or stem (A) into a hole or trench 4-6 inches deep and fasten it down to the ground with a wire peg (B). Bent U-shaped coat hangers work well. If the branch is stiff, insert a stake next to the shoot to hold the tip in an upright position (C). Fill the hole or trench and mound the soil slightly so the wounded portion of the stem will be 4-6 inches below the soil. Firm the soil.
Keep the soil around the layer moist at all times and cover with a 3”-4” layer of mulch. The layer may form roots during the first season but should not be cut form the parent plant until the following year. Some hard to root types may take two years to produce roots.
After the layer is well rooted, sever the branch where it enters the soil. Don’t disturb the roots of the layered plant for 2-6 months after it has been severed. This will allow the new plant time to grow independently. When the new plant is dormant, it can then be transplanted to a convenient protected spot or container where it can be tended carefully for one year before moving it to a permanent location.
 Serpentine Layering
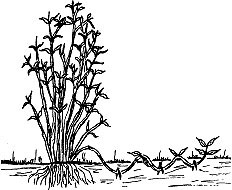
Serpentine layering is suitable for long vines and requires that the shoot be alternately covered and exposed. The technique is simple layering in
multiples. Wounds should be made on the lower portion of each curve between leaf nodes. Bend the shoot down so that each wounded area is in
the bottom of a hole and the shoot between is still above ground. Peg them in place as done with simple layering. Do not layer the tip of the shoot or this will root and the other layered sections behind it will rot. This method is suitable for vines such as honeysuckle, clematis, or wisteria. The branch is cut into segments after rooting has taken place.
 Tip Layering
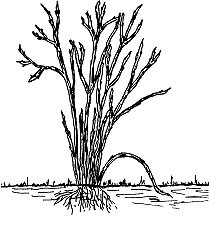
Tip layering on raspberries and blackberries is easy to do in the spring. It consists of rooting tips of the current season’s growth. The tip of the shoot is where the strongest concentration of rooting hormones is. Rooting can be stimulated in late summer as the drooping canes develop an elongated appearance and leaves become smaller. Pull the tip of these shoots down and insert them in holes 4-6 inches deep. Peg the tip down with U-shaped pieces of wire and fill the hole with free-draining soil. Rooting generally takes place rapidly and the plants may be transplanted later the same season. Survival is better if transplanting is delayed until just before growth starts in the following spring.
To stimulate more tips, pinch out the top 3-4 inches of a 2-foot tall cane in the spring. By late August or early September, the new growth will arch
down, touch the soil and turn upward. These often root without assistance at the point of the curve where they touch the soil.
Care after rooting layered plants: The root system of newly rooted layers is small in relation to the tops. As soon as the layer forms new roots, cut it from the parent plant and transplant it to a container. Prune the stems so that the leaf area is reduced to at least one-third. The new plants should be located in a lightly shaded area. Suitable shading may be made from an old window screen. After the first winter, the screen can be removed. Sufficient roots should have developed so that the plants can be moved to a permanent location.
Air Layering
Air layering is a useful method for rooting difficult to root plants, which include magnolia, witch hazel, gardenia, rose, fig, holly, camellia, azalea, and many of the fruit and nut bearing plants such as apple, pear, and pecan. The procedure is to wound the stem or branch of the plant and enclose the wounded stem with moist sphagnum moss until roots develop from the wounded area. For optimum rooting, make the air layers in the spring on shoots produced from the previous season’s growth or in midsummer on mature shoots from the current season’s growth. On woody plants, stems that are pencil size or up to ¾ inch diameter are best. The stem may be much thicker on the more herbaceous plants.
First remove leaves and twigs on the selected limb for 3-4 inches above and below the point where the air layer is to be made. The air layer is usually made 12-15 inches below the tip of the branch. The branch is wounded to induce rooting. The method of wounding woody plants such as magnolia, rose, and similar plants is to make two parallel cuts with a shape knife about 1-1/2 inches apart around the stem and through the bark and cambium layer. If the cambium layer is not removed, new bark will form instead of roots. Connect the two parallel cuts with one long cut and remove the ring of bark, leaving the inner woody tissue exposed. You may want to cover the cut nearest the tip with rooting hormone although this is seldom necessary.
Apply a handful of damp sphagnum moss so that it envelops the wounded portion of the stem. It may be necessary to wrap kitchen string around the moss to hold it in place. The sphagnum moss should be soaked several hours before using to ensure that it is thoroughly moist. Squeeze out the excess moisture, as it will result in decay of the plant tissue.
Use a sheet of polyethylene film (plastic wrap works well) about 6 inches by 12 inches to wrap around the ball of sphagnum moss. Be sure there is a good seal all around. Make sure the upper end of the film fits snugly around the stem and none of the moss is exposed. Fasten securely with twist ties but not so tight as to bite into the stem. This will allow you to open the plastic wrap to check for rooting without disturbing the new roots. You may use electrician tape instead of twist ties but take care that the tape extends beyond the film and adheres to the stem. Repeat the procedure on the lower end, making sure there is a snug fit. Moisture should not be allowed to escape from or leak into the wounded area. If necessary, support the plant with a stake or splint to prevent breakage at the wounded area. Wrap with aluminum foil large enough to completely cover the plastic wrap and extend up and down the branch a couple of inches in either direction. This will prevent heat buildup under the plastic. Crimp the foil for a good seal.
The rooting time will vary with each plant variety as well as the season in which it is performed. In 6 weeks to a year or so, you should have a new plant. If no roots are visible in the moss ball, carefully remove the plastic and moss to check the cut area. If the wound is still moist and has a swollen callus tissue at the top, then the roots should appear soon. Replace the packing with new moist moss, plastic, and aluminum foil. If the stem has healed over the wound, start again with a different shoot.
After the new roots have penetrated the moss ball and are visible on all sides, the rooted branch may be removed from the parent plant. Remove the newly rooted plant from the parent plant with a sharp knife or pruning shears, making the cut just below the ball of moss and roots. Carefully remove the aluminum foil and plastic wrap. Plant the root ball of moss in a container using a good potting mixture. Be very careful when you firm the dirt around the new plant since the new roots are easily broken off. The potted plant may be placed in a cold frame in a lightly shaded area to allow for the establishment of roots and to harden off the new plant. Keep it in a sheltered area for at least 4-6 weeks before you move them into stronger light. The plants will let you know when they are ready for more light by sending out new growth.
If you don’t have a cold frame, you can accomplish the hardening off process by placing a polyethylene tent over the newly potted plant for about 2 weeks to prevent moisture loss. Keep the plant in light shade and avoid direct sunlight until the new root system is well developed. Harden off the plant gradually by cutting a few holes in the plastic tent to reduce the humidity until it reaches the surrounding environmental conditions.
The University of Florida’s Landscape Plant Propagation Information (LPPI) website, http://hort.ifas.ufl.edu/lppi/htm, contains a lot of information on propagating many different plants.
Table 2. Some Common Plants Suitable for Layering
| PLANT | LAYERING TIME | LAYERING METHOD | ROOTING TIME |
| Akebia spp. | Early spring to early autumn | Serpentine | 12-18 months |
| Azalea spp. | Early to late winter | Simple | 9-12 months |
| Azalea spp. | Early to mid-spring | Air | 12-18 months |
| Buxus spp. | Early to mid-spring | Dropping | 6-9 months |
| Camellia spp. | Later winter to early spring | Simple | 6-12 months |
| Campsis radicans | Mid-to late autumn | Simple, Serpentine | 9-12 months |
| Clematis spp. | Mid-to late autumn | Simple, Serpentine | 9-12 months |
| Daphne spp. | Early to midsummer | Simple | 6-9 months |
| Euonymus spp. | Early to mid-spring | Simple | 6-12 months |
| Ficus elastica (rubber plant) | Mid-spring to late summer | Air | 6-9 months |
| Forsythia spp. | Spring to late spring | Simple | 6-9 months |
| Fothergilla spp. | Late summer to early autumn | Simple | 12-18 months |
| Hamamelis spp. (witch hazel) | Early to mid-spring | Air | 12-18 months |
| Ilex spp. | Late summer to autumn | Air | 12-18 months |
| Ilex spp. | Early to mid-spring | Simple | 9-12 months |
| Jasminum spp. | Early to mid-spring | Simple | 6-9 months |
| Magnolia spp. | Early to mid-spring | Simple | 12-18 months |
| Magnolia spp. | Mid-spring to late summer | Air | 18-24 months |
| Rhododendron spp. | Early to mid-spring | Simple | 12-18 months |
| Rubus spp. (blackberry, etc.) | Early spring to midsummer | Tip | 3-6 months |
| Viburnum spp. | Early to mid-spring | Simple | 9-12 months |
| Vitis spp. | Early to late winter | Simple, Serpentine | 9-12 months |
| Wisteria spp. | Early to mid-spring | Simple, Serpentine | 12-18 months |


